Noise is not only a problem for getting good analytical results in the laboratory, but is an issue for the photographer. In my previous three blogs I presented a theoretical basis for dealing with analytical noise that applies to any measurement process including photography. For the photographer, digital noise is most bothersome in the shadow details. This is because there is less digital information in the shadows than the mid-tones and highlights. Less light means fewer photons, fewer photons mean fewer pixels, and fewer pixels is less digital information. Increasing the sensitivity to boost the signal for low light does not solve the problem, it just increases the noise.
[If you missed the earlier blogs that covered basic theory, don't panic. You can still read them starting with What is Detection and What Does it Mean for Photography. ]
An Approach from the Lab
In earlier blogs I have noted that while an individual measurement near the detection limit has limited value because of the large associated error (i.e., noise is large relative to the measurement), in the context of a data set a collection of measurements has statistical utility even when all of the measurements are near or even below detection. That is because the errors, which are random in nature, average out. The same is true in photography. Consider that each pixel in your image is the consequence of photons striking the sensor. But sometimes the sensor will create more than one pixel for an in-coming photon and sometimes it will create no pixels for in-coming photons. This is a random process, meaning that sometimes the effect will be positive and sometimes negative. If you can average enough random events in a series of nearly identical events, the random noise will be averaged out and canceled.
An Example
Consider the following photograph titled It's Really Very Underexposed! The only visible detail is in the sky, where the highlights are. For this shot near sundown, I exposed it so that the highlights in the sky would not be blown and set the f/stop to maximize depth-of-field. (Note a double-click on any of the images will open it at a larger resolution.)

It's Really Very Underexposed!

Curves Adjusted to Open Shadows
So now it should be obvious that there was light in the shadow areas, but not very much. As a consequence, just like measurements in the lab, when the measurement is near the limit of detection, there is a lot of noise that makes accurate results difficult - but not impossible. See the next image as a crop of the one above to convince yourself that there is a lot of noise in this version (mouse-click the image for a larger more viewable version).

Crop of Curves Adjusted to Open Shadows
So how do you get rid of the noise?
Canceling the Noise
One way of reducing the noise is to use a noise-reduction program. I did this using Neat Image. There are other programs, but the results would be similar as in Noise Reduced But What Happened to the Detail?

Noise Reduced But What Happened to the Detail?
A close examination will show that while the noise has been reduced, so has the detail. The image has a soft appearance and is not as sharp as it should be. Using a noise reduction program will not restore digital information that was not there. But what if you could add digital information the same way you could average a series of laboratory measurements? You can.
A Less Noisy Approach
If you put your camera on a tripod and take a series of exposures all at the same ISO, f/stop, and shutter speed, you will get a series of almost identical images. I say almost identical, because the digital noise in each image will have a different distribution. Remember, it is random noise. While some noise is not random (e.g., non-responding cells in the sensor) the nuisance shadow noise is and if it is random it can be averaged and thus cancelled.
The next step requires Photoshop or another image processing software. This example will use Photoshop CS3. Bring all of the separate images into a single file as layers (see screen shot below). Select all layers then align them using Edit>Auto-Align Layers. It may speed things up to get the individual layers in a rough alignment before you do this.
Now that you have the layers all aligned, use Image > Apply Image to 'add' pixels in the individual images. (Note that you can check to see if any two layers are aligned by selecting merge mode 'Difference.' If they are aligned, the image will be all black.)

Layers aligned and Apply Image Selected
Once the Apply Image dialog box is open, make sure the image title you are working on is in the source (IPG2083.jpg in this example), that the blending mode is set to 'Normal', and the opacity is set to 20% (it seems to be the optimum setting, but you can experiment with this setting).
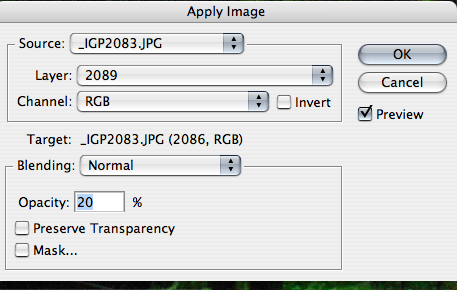
The target will be the top most layer (IPG2083 in this example) and 'Layer' will be the next layer in the stack (2089). Repeat this process of Apply Image to the top layer (IPG2083) with each of the succeeding layers in the stack. At each repetition you should see a small reduction in the noise until you finally get something like:

The Noise Reduced Image
While there are limits to this approach to noise reduction (sports action is probably out, but if you figure out how to do it, please let me know!), I hope you find it useful and can put it to use.
Next
A Visual Approach to Dealing with Large Data Sets


No comments:
Post a Comment